Creating a likeness or "portrait" of a real horse can be a daunting task. There is much more to it especially when the real horse is a heavily marked appaloosa, as in the case of Rocky, and because I wanted to try to get as close as possible to what the real Rocky looks like. How does one get started? Photos. And lots of them!
In this series, I'll do my best to chronicle the journey of creating the paint job for this piece from start to finish.
To begin, the client shipped me an Eberl resin which needed quite a bit of prep work and because I'm a stinker when it comes to prep I took my time making sure I did a good job. This was obviously an older resin as it had a lot of pin holes that needed filling and I did that with a watered down epoxy putty crushing it into the holes to fill them. It seemed every time I thought I as ready to move on to the next step, more pinholes would "appear" when I added a layer of primer. ARGH!!
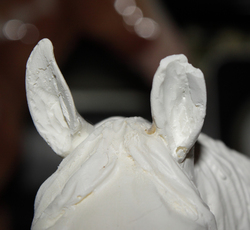
Then, I did the unthinkable!! I put the resin down to dry and like a fool didn't set him right and over he toppled loosing the tip of his ear. OK totally not cool, but alright, easy fix. After the putty and primer dried, I broke out with the baking soda and super glue and went about the task of recreating the ear tip because I could not locate the piece that broke off.
In this series, I'll do my best to chronicle the journey of creating the paint job for this piece from start to finish.
To begin, the client shipped me an Eberl resin which needed quite a bit of prep work and because I'm a stinker when it comes to prep I took my time making sure I did a good job. This was obviously an older resin as it had a lot of pin holes that needed filling and I did that with a watered down epoxy putty crushing it into the holes to fill them. It seemed every time I thought I as ready to move on to the next step, more pinholes would "appear" when I added a layer of primer. ARGH!!
Then, I did the unthinkable!! I put the resin down to dry and like a fool didn't set him right and over he toppled loosing the tip of his ear. OK totally not cool, but alright, easy fix. After the putty and primer dried, I broke out with the baking soda and super glue and went about the task of recreating the ear tip because I could not locate the piece that broke off.
I don't recall which artist came up with this method of repair (I believe it was posted on Sarah Rose's blog) but this method is indeed a godsend!
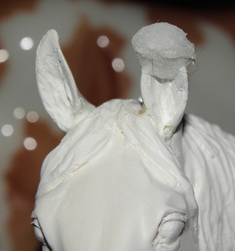 |  |
In the above images, you can see the gob of soda/glue mixture I applied in stages and then let this dry thoroughly. In the right hand image, I've shaped out the ear and would later go back in to detail it out recreating the shape as close to the original as I could get.
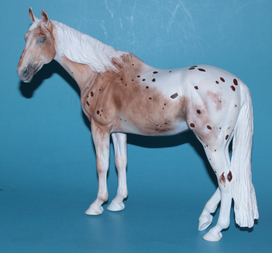
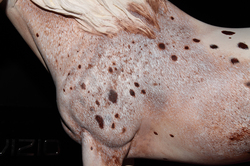
Then, it was on to finishing prep and to begin the painting process. What I originally thought to do in order to apply the paint was a strategy I ended up abandoning. I was going to try applying colors one hair at a time in different shades based on Rocky's real summertime coat. That strategy I quickly abandoned after completing the Veronka piece which I did a whole different way. Every model I paint is a learning experience and I add a little more to my toolbox each time. I started over by applying some pastel dust over the body in a darker shade than the real Rocky has. This would later serve as a platform with which to roan out the body. The appy spots were positioned although I would later need to adjust as I progress.
Then, it was on to finishing prep and to begin the painting process. What I originally thought to do in order to apply the paint was a strategy I ended up abandoning. I was going to try applying colors one hair at a time in different shades based on Rocky's real summertime coat. That strategy I quickly abandoned after completing the Veronka piece which I did a whole different way. Every model I paint is a learning experience and I add a little more to my toolbox each time. I started over by applying some pastel dust over the body in a darker shade than the real Rocky has. This would later serve as a platform with which to roan out the body. The appy spots were positioned although I would later need to adjust as I progress.
I started working on the left shoulder and barrel looking at pictures of the real Rocky as I went along applying individual hairs in an off white color. In showing this to the owner, I realized I didn't have the shoulder spots in the right place. So, the owner was kind enough to send more pictures parallel to his shoulder and from here I would adjust the placement of those spots. Now, this is several layers of work in just this one area including 'smudging' some darker burnt umber/sienna mix to darken some of the hairs like the real horse.
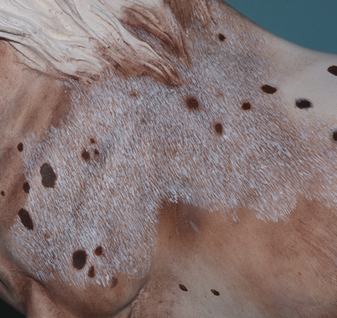 | 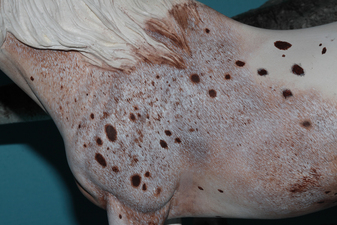 |
Here is the shoulder again with the spots adjusted. I still need to roan out with some raw sienna shade to get the base color a bit closer to the real horse's color and I've also done some work up the shoulder at this point.
And this concludes the first installment!
 RSS Feed
